I recently made a gift for my son to give to his little friend, Rohan. Ro’s mom is a dear friend of mine so when we were pregnant at the same time we knew that our boys would end up with lots of play dates and hopefully will experience as great of a friendship that we have enjoyed over the years. Anyway, I thought it would be fun to share how I made this super easy (and super cute if I do say so myself) stepstool. It’s perfect for toddlers who need a little extra help to reach the sink or who just want a place to sit that’s just their size.

Materials you will need:
1. Unfinished wood step stool (from any craft store)
2. Acrylic paint (I like Basics)
3. Paint brush (I used a stencil brush for this project)
4. Foam paint brush (similar to this one)
5. Mod Podge
6. Old newspaper or something to cover your workspace
7. Jar or cup for water while you paint along with a dry paper towel to wipe your brush as needed
8. And last, but definitely not least, my favorite supply: vintage alphabet flash cards from the Boston Bag Lady’s etsy shop . She has a TON of cute things in her shop – have fun deciding if your stool has vintage go go go cards , vintage Raggedy Ann characters , vintage crazy eights cards , etc…
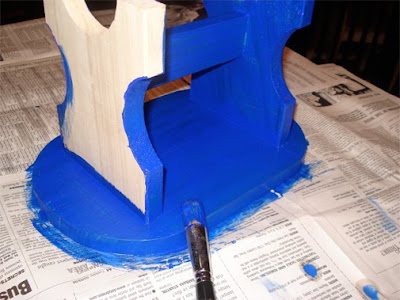
Now that you have all of the supplies you need, the first step is to prep your workspace. First, cover your table with newspaper or newsprint. Then, fill your glass jar with water. Place all of the materials you need for the project on your covered table and you are now ready to start painting!

I recommend painting the bottom of the stool first for drying purposes. Simply start on the bottom with your stencil brush (I think stencil brushes are the easiest to work with on unfinished wood) and flip over when you are ready. You may need to do two coats, depending on the look you are going for.

After your piece is completely dry, place your collage materials of choice on the stool in the way that you want them to be arranged. Next, apply the Mod Podge to the cards as if it were a glue with your foam paint brush. After all of your pieces are “glued” down, simply paint a thin layer of Mod Podge over your entire stool. Let it dry – and you’re done! It’s that easy (and fun)!


2 comments:
I've made these before too - they're easier than you think.
One Christmas they were the gifts for all the little cousins... the alphabet cards are a great addition. thanks for that source. etsy finds are so fun to pass along.
What a great little kids project! The step-by-step is very nice, and a great way to recycle cards.
Check out my blog if you like Mod Podge, you would probably enjoy!
http://www.modpodgerocks.blogspot.com
Post a Comment